Shipping Label Generator Guide for Small Sellers
- 30 Aug, 2026
A small seller can lose half a morning to the same mistake: mixing up postage buying with label generation. One system buys the shipment, another renders the artwork, and a thermal printer only cares that the file is exact, scannable, and sized right.
That separation matters for anyone printing internal labels, packing slips, return labels, box labels, or a whole batch from an orders CSV. A shipping label generator is the part that turns template fields into print-ready output, while postage still comes from USPS, DHL, UPS, or a shipping platform. Zandovi fits that narrower job because it generates label artwork from a template, binds address, order number, and barcode fields to variables, and prints to exact label dimensions at 300 DPI. It doesn’t buy postage, fetch carrier rates, or produce carrier-certified labels.
Table of Contents
- What a Shipping Label Generator Actually Does for Small Sellers
- Designing the Label Template and Binding Variables
- Picking the Right Barcode Symbology for Labels and Cartons
- Single Render vs Batch Job From a CSV
- Return Labels, Packing Slips, and Reverse Logistics
- Print Settings, DPI, and Pre-Flight Checklist
- From CSV to Printed Labels the Repeatable Workflow
What a Shipping Label Generator Actually Does for Small Sellers
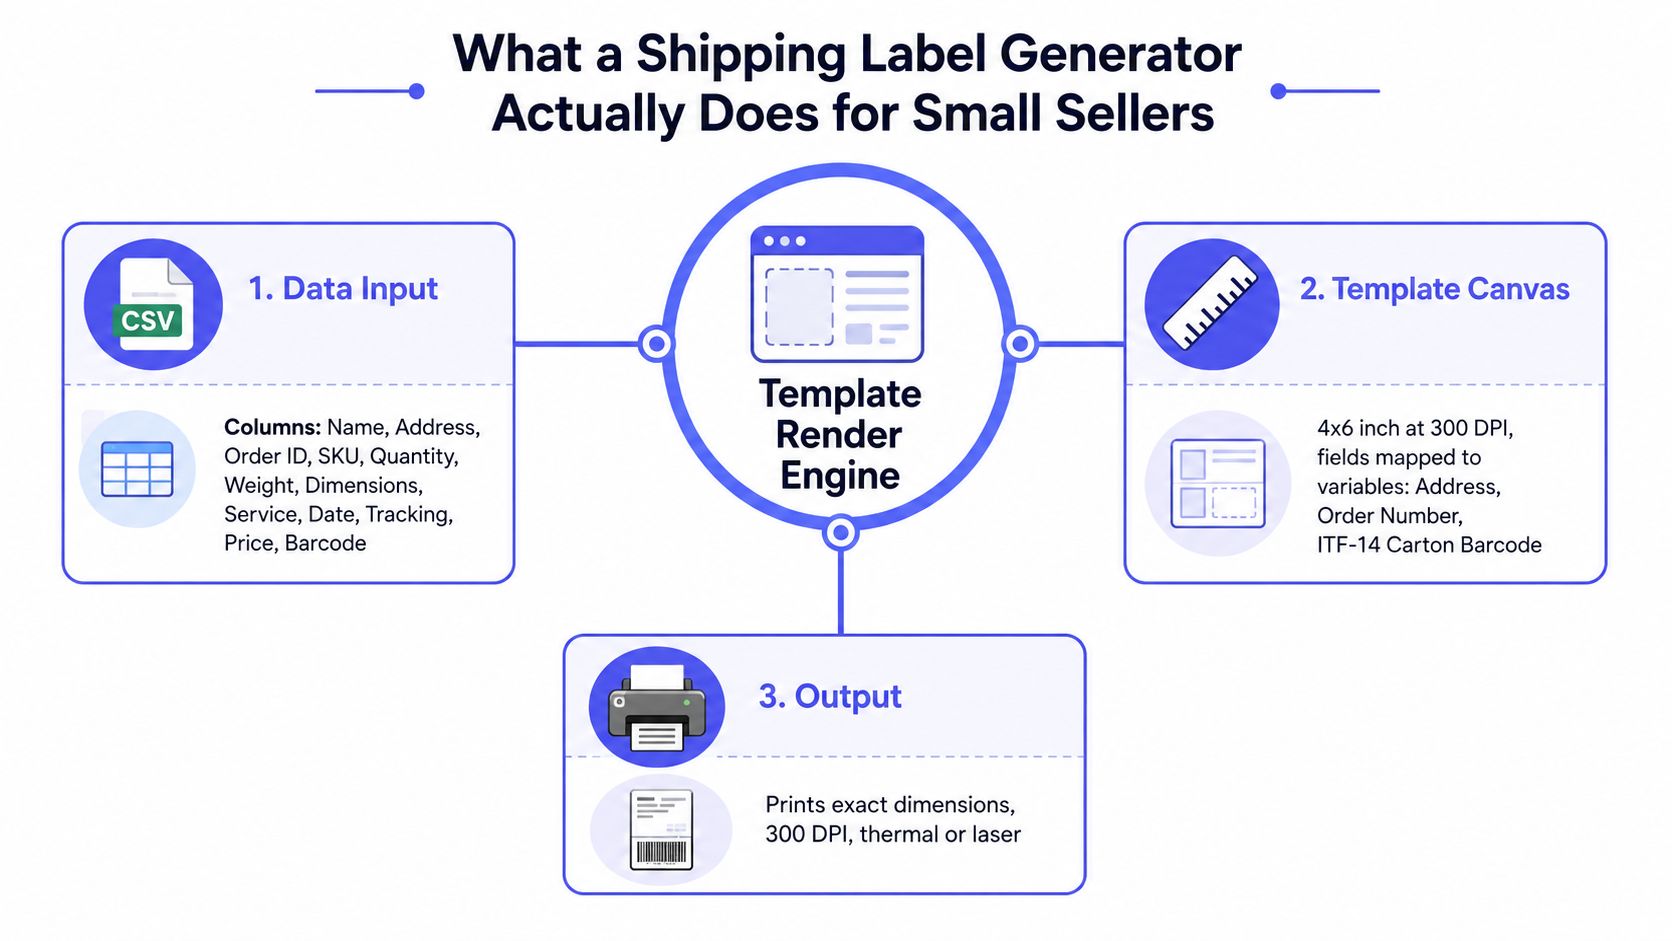
A Monday-morning Shopify export can make the difference obvious fast. The warehouse lead has a CSV with recipient names, street lines, order IDs, SKUs, and maybe a return reason code, and the printer queue needs something clean before packing starts. A shipping label generator takes that data, drops it into a designed template, and outputs a PNG or PDF that the printer can consume without a human editing every order.
Artwork generation, not postage purchase
That’s the part many teams blur together. Postage purchase lives in carrier tools or shipping software, while the generator handles the layout, the font sizing, the barcode placement, and the quiet zones that make scanning work at the dock. The output can be a parcel label, a packing slip, a carton label, or a return label, but the rendering step stays the same, the data changes.
Shipping labels are not just decoration. Barcode-based logistics runs at scale, with 7.8 billion barcode scans per day worldwide in 2023 in GS1 ecosystem reporting, and labels have to survive repeated scans across sortation and returns flows. Barcode standards and readable label geometry are what keep that system working, not a prettier layout alone, as noted in barcode industry coverage and logistics guidance. The broader shipping-label market also reflects that shift, with a 2026 industry report valuing the global market at USD 2.3 billion in 2025 and projecting USD 3.6 billion by 2036 at a 4.2% CAGR (shipping-label market report).
Practical rule: keep postage logic out of the renderer. If a label file needs a carrier service code, pass it in as data, don’t ask the template layer to decide shipping policy.
What the file should contain
At the template layer, the file needs the fields a packer would otherwise type by hand. That usually means the from address, ship-to address, order number, a tracking placeholder, and one barcode field. If the workflow also prints box labels, pallet marks, or a carton ID, those are separate render targets, not a different kind of shipping logic.
A good generator keeps the output deterministic. Same template, same row, same pixels, every time. That’s why a template-rendering API is useful for small sellers who want reliable print assets without pretending the renderer is the carrier.
Designing the Label Template and Binding Variables
A useful template starts with the physical label, not the browser canvas. For parcel work, 4 × 6 inches is the common size, and one label-size reference maps 100 × 150 mm to roughly 1181 × 1772 pixels at 300 DPI (label size converter). That gives a practical target for print artwork, especially when the output must land cleanly on a thermal roll or a laser sheet.
Set the canvas to the printer, not the other way around
For thermal work, 203 DPI is usually enough for standard shipping labels, while 300 DPI is safer for smaller or denser barcodes, and 600 DPI is reserved for specialist compact designs (barcode printing guidance). The label generator should render at the exact physical size, then let the printer output at 100% scaling, not “fit to page.” That prevents cropped corners, soft barcodes, and shifted address blocks.
The template layout itself should be boring in the best way. Put the sender block in the upper-left, the recipient block in the center, and reserve a clean lower-right area for the barcode and its quiet zone. If the label also carries carton IDs, that field belongs on the carton template, not crammed into the parcel label.
Bind every changing field to a variable
A CSV row becomes useful only after its columns map cleanly into placeholders. Typical bindings look like {{ship_to_name}}, {{ship_to_address1}}, {{ship_to_city}}, {{ship_to_zip}}, {{order_id}}, and {{sku}}. Optional fields like {{weight_lb}} or {{service}} can stay blank when the seller doesn’t need them, but the template should still expect them by name.
Missing fields are dangerous because they often fail silently. A blank barcode or truncated postcode can look fine on screen and still break at scan time.
A template library helps here because it gives the seller a carrier-aligned starting point instead of a blank page. Zandovi’s shipping-label template library is available at https://zandovi.com/templates/shipping-labels/, and the same template approach works well for sellers who later adapt the size for international A4 output.
Picking the Right Barcode Symbology for Labels and Cartons
Barcode choice should follow the job, not the aesthetic. A tracking number on a parcel label and a GTIN on a carton don’t serve the same purpose, so they shouldn’t use the same symbology by default. GS1 guidance says ITF-14 is used for traded units such as outer cases, while GS1-128 is used when additional data like expiry dates, weights, batch numbers, or SSCCs must be encoded (GS1 retail barcode guide).
Code 128 for order and tracking fields
For shipping workflows, Code 128 is the workhorse. Independent label-printing references list it as a logistics and shipping-label symbology, and USPS package-identification labels also use Code 128 formatting for fixed-data package IDs (barcode label reference, USPS package identification Code 128 spec). That makes it the right default for order numbers, tracking zones, and internal package identifiers.
ITF-14 belongs on cartons and outer packs, not on every parcel label. Its role is to identify traded units, especially when a retailer or warehouse needs a carton-level code that scans reliably through handling. If the workflow needs return-portal links or richer metadata, a QR code can carry that data, but the core shipping label still usually needs a linear barcode for carrier and warehouse scanning.
Compare the symbologies by job
| Symbology | Best Use | Min Module Width | Quiet Zone |
|---|---|---|---|
| Code 128 | Order numbers, tracking fields, package IDs | Use printer resolution and target scan distance to set the X-dimension | Keep a clean blank margin around the bars |
| ITF-14 | Cartons, outer cases, traded units | Use a wider, high-contrast bar pattern for compliance scanning | Leave the bearer-bar and surrounding margin intact |
| QR | Return portal links, mixed data payloads | Use a module size that stays readable at the target print DPI | Keep the required quiet zone around the code |
| Code 39 | Internal bins, legacy warehouse labels | Keep it simple and large enough for human handling | Leave enough blank space to avoid crowding |
The important operational point is consistency. Pick the symbology once per template, then render it the same way across the batch. That keeps scan behavior predictable at the printer, the pack desk, and the carrier hub.
Single Render vs Batch Job From a CSV
A single label render is the simplest path when the order volume is still lumpy. One JSON payload goes in, the generator returns one PNG or PDF, and the packing desk can print immediately. That’s useful for manual tests, webhook-driven orders, and any situation where a picker wants to confirm the layout before committing a whole batch.
One order at a time
Single-render endpoints fit the way many small operations work. A merchant prints one replacement label, one sample, or one rush order without standing up a spreadsheet import flow. The drawback is obvious, though, because every label is its own request and the process gets slower when someone has to repeat it dozens of times.
Batch jobs solve the repeat problem. A CSV upload or line-delimited JSON file can feed the same template with many rows, and the response usually comes back as a job ID plus a status path or callback. Zandovi supports batch generation from CSV rows, and its plan structure caps rows per job at 25, 100, 200, 300, or 400, depending on tier, while 1 render = 1 image or 1 PDF with no format multipliers. Manual editor exports are unlimited on paid plans.
The decision to make before printing at scale
A practical batch setup needs idempotency. If the same order_id appears again because a CSV gets retried, the job should return the original render instead of creating duplicates. That protects both inventory and customer service, especially when labels are attached to fulfillment states that downstream systems assume are unique.
Operational shortcut: send delivery by link when the workflow ends in automation. An HTTP request node can pick up the link, pass it through a scenario, and avoid writing files to local storage.
| Aspect | Single Render | Batch Job |
|---|---|---|
| Input shape | One JSON payload | CSV or row set |
| Output timing | Immediate | Asynchronous |
| Best for | Testing, rush orders, webhook events | Fulfillment runs, CSV imports |
| Failure handling | Easy to inspect one result | Needs job status or callback handling |
| Automation fit | Simple integrations | n8n, Make, Zapier-style HTTP flows |
That split keeps the shipping-label layer honest. Single renders handle exceptions, batch jobs handle throughput, and neither one needs to pretend it’s a postage engine.
Return Labels, Packing Slips, and Reverse Logistics
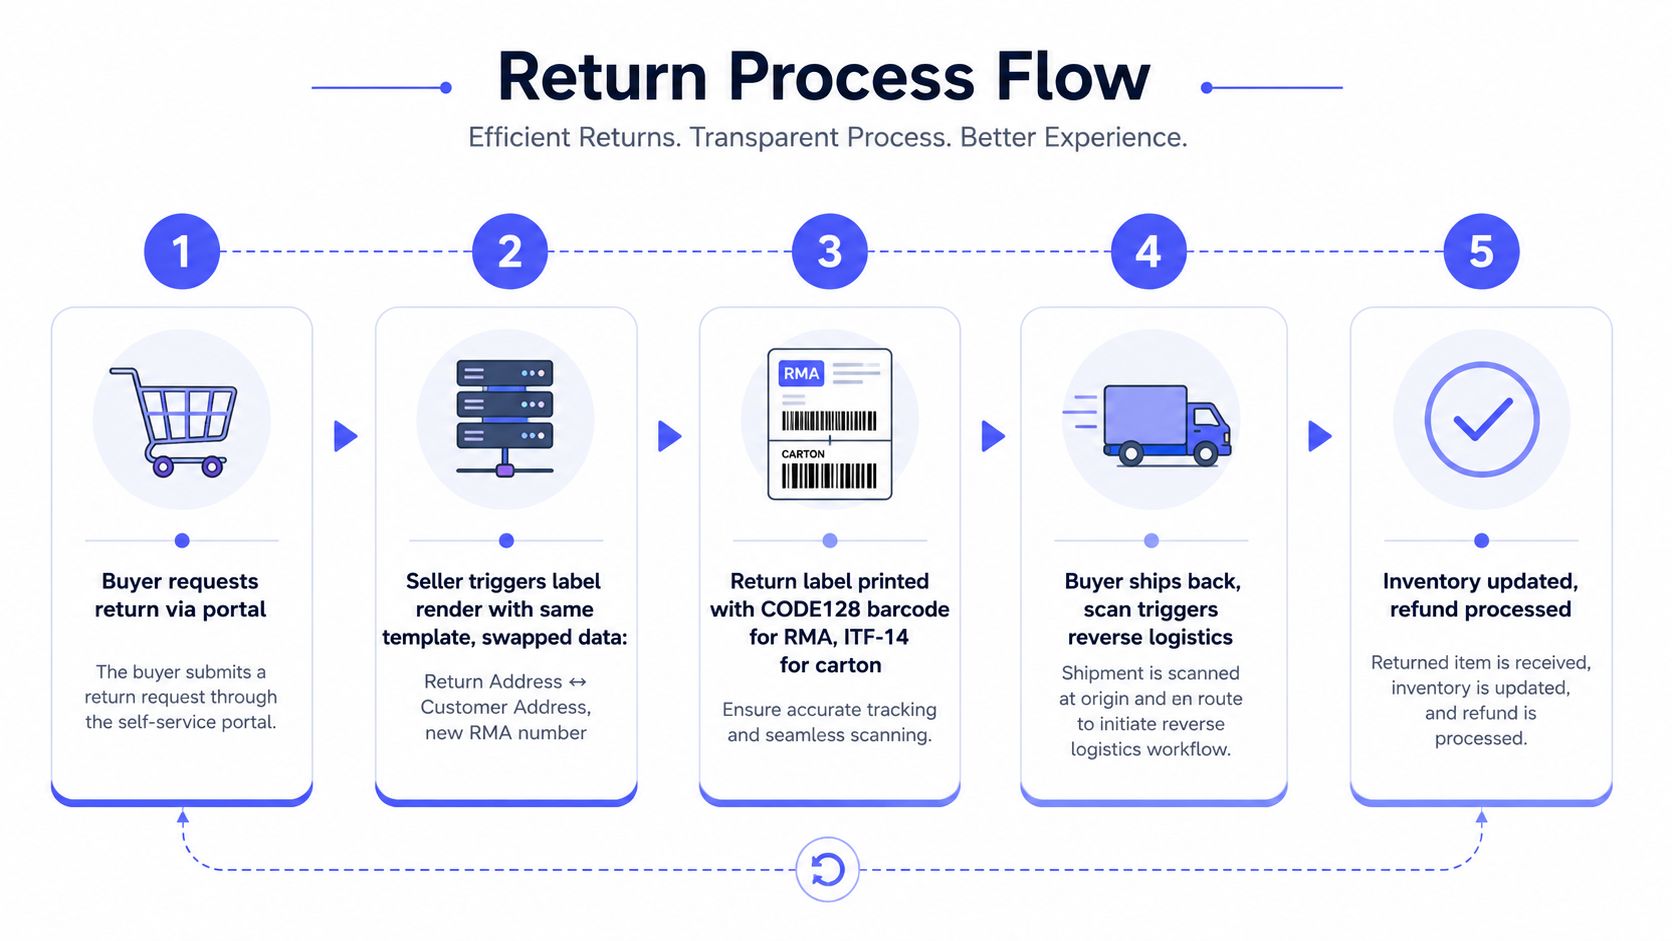
A return starts the same way every time, a buyer says the order needs to come back. The seller then renders a second label from the same template family, but the data flips, so the merchant address becomes the return destination and the buyer’s address becomes the sender on the return form. That swap is the core mechanic behind a clean reverse-logistics flow.
Include with the order or email on request
Two patterns show up again and again. Include-with-order puts the return label in the outbound parcel, usually as a smaller companion sheet or a second panel. Email-on-request waits until a return case opens, then sends a PDF link after the buyer submits the reason.
Independent shipping help pages already treat return labels as a separate use case, but the core friction is workflow design, not field labels. The hard question is when to preprint, when to delay, and how to keep the customer from editing sender and receiver fields by hand. That’s where template-driven reverse logistics helps, because the same render engine can produce the outbound label, the return label, and the packing slip with different assets.
Packing slips usually follow the same pattern as the label, just with a different layout. The merchant reuses the same data source, but the document is meant for humans checking contents, not for carrier sortation. That separation keeps the parcel exterior scannable and the interior paperwork readable.
What changes inside the template
A return reason code can sit in a barcode or a text block, depending on how the warehouse team wants to consume it. The label may also need a service code or RMA field if the receiving dock sorts returns by disposition. That is still a template job, not a carrier-rate job.
The same reverse-logistics pattern also fits invoice-like paperwork. A shipping workflow can borrow the same render system used by a document template, and Zandovi’s invoice templates show how layout reuse can stay separate from transport logic. The useful takeaway is simple, one generator can serve several documents, but each document should keep its own purpose and scan behavior.
Print Settings, DPI, and Pre-Flight Checklist
Most label failures show up at the printer, not in the API. A file can look fine in the preview and still fail because the driver rescales it, the printer clips the quiet zone, or the barcode density doesn’t match the device resolution. That’s why print settings deserve as much discipline as the template itself.
Match the export to the device
A 203 DPI thermal printer needs source artwork sized for its pixel density, while 300 DPI works well for inkjet, laser, and denser barcode layouts (barcode printing guidance). The safest output for shipping work is usually a flattened PDF or a vector-style page rendered at the exact physical size, because that reduces the chance of re-encoding artifacts. PNG can work, but only when the page size and scaling are controlled tightly.
Quiet zones need real space. Barcode references commonly call for a margin of at least ten times the narrowest bar width around the barcode, and that blank space has to survive the printer driver and the adhesive sheet or label roll. If the barcode gets crowded by an address block or a crop box, scanners often fail at the worst possible moment, at the carrier hub or the packing desk.
Pre-flight checklist for the first print run
- DPI match: confirm the export matches the printer, with 203 DPI for common thermal heads and 300 DPI for denser output.
- Canvas size: keep the page at the exact label size, usually 4 × 6 inches for parcel labels.
- Barcode clarity: verify that Code 128 stays black, crisp, and uncrowded, with no gray conversion on thermal stock.
- Scaling: set the print dialog to 100%, not fit-to-page.
- Test print: run one label on plain paper before using adhesive stock.
- Physical check: measure the first printed label with a ruler before the batch starts.
The first bad print usually comes from scaling, not design. A clean template can still fail if the driver decides to be helpful.
A final detail matters for production runs. VDC research summarized in a barcode-labelling whitepaper found the biggest error sources were unclear template selection 49%, incorrect data on labels 49%, manual spot-checking 46%, and unscannable barcodes caused by poor print or media quality 45% (barcode-labelling whitepaper summary). That’s a strong argument for deterministic templates, automated data validation, and scan checks after application, not just after export.
From CSV to Printed Labels the Repeatable Workflow
A small seller usually needs the same pipeline every time, just without the manual retyping. The clean version starts with orders_export.csv containing order_id, ship_to_name, address_1, city, postcode, weight, and service, then maps those columns into template variables, chooses the barcode symbology, and submits the batch job for rendering. If the workflow is built that way once, the same process can run every morning without a different operator improvising the layout.
The workflow that scales without drama
The most stable setup is straightforward. Use a 4 × 6 inch canvas, render at 300 DPI for thermal or print-ready PDF for office printers, bind tracking fields to Code 128, and keep carton identifiers on ITF-14 when the box needs its own mark. If the automation layer is n8n, the delivery step can use a link response, which keeps the file handoff clean and avoids local storage churn.
Template versioning matters more than teams expect. So does carrier service-code mapping, because one wrong code can print a clean-looking label for the wrong service level. Error fallback should also be decided up front, whether a bad row gets retried automatically or pushed to a human queue for correction.
The simplest rule is the one that survives Monday mornings.
- Lock the page size: choose one label size and keep it fixed.
- Keep the template version stable: change layout only when the print logic changes.
- Map carrier codes once: don’t let each row invent its own service logic.
- Set an error path: retry for transient failures, human review for bad addresses or missing fields.
- Print one test row: confirm the label before launching the full batch.
A template-rendering API like Zandovi can fit this flow because it reads templates and renders them, which is the exact boundary a seller needs when postage buying stays in carrier or shipping-platform software. The useful outcome is not a bigger shipping stack, it’s a smaller, more reliable one.
For teams ready to ship their own labels without mixing artwork with postage, the next step is to load one template, map one CSV, and print ten test labels before scaling the job. Start with the shipping-label template library, keep the carrier logic outside the renderer, and verify the first batch on real stock before the morning run goes live.